
So recently I started thinking about my HA system when I have guests. I have a small house (not a tiny house) just a small house. When my parents visit they setup camp in the living room.
 Working on getting PIR motion sensors to turn things on and off. But with guests, I need a guest mode to disable the motion sensor…. and not because I tend to dance in front of the motion sensors.
 But with the motion sensors disabled. There still needs to be a way for the folks to control the lights. So I started thinking.
What I came up with was physical buttons, pass something to mqtt, then to openhab. Openhab rule to control “group” of lights aka living room.
So time to start proto typing some things. First I wanted to see if I could somehow make it work without putting holes in the wall. WAF = 10 on that one.
 So I started by 3d printing a light switch blank panel. It’s a rough print, but needed to see if I could make it deep enough to put some triple A batteries to run it.
Once I tested some depth I was happy.
 Next to build build some electronics.
So I broke out the good old arduino uno. This is my go to for initial builds even though I usually end up with a pro mini in the end. The uno is a great test bed.
So it started out with Uno + Ethernet Sheild + 2 buttons.

I ended up adding just a notifcation LED just so I know once it’s connected to MQTT since I am not watching via serial monitor now. 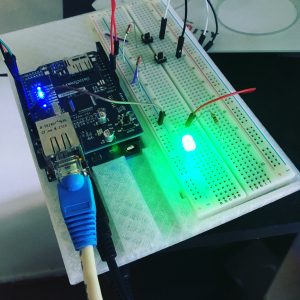 So what does this get us now? Well. It boots up. You press one button, all the lights in the living room turn on. Press the other and they turn off. I know what you’re thinking. So what?
One of the lights is a phillip hue light. The other is controlled via z-wave. So how did I do this. Lets start with the item definitions in openhab.
//Group Definition
Group gLivingRoomLights

//Items
Switch Switch_LivingRoomStandingLight "Living Room Light"     <light> (gLivingRoomLights,gDashboard) { zwave="2:command=switch_binary" }
Switch LivingRoomTableLight   "Living bulb" (gLivingRoomLights,Switching) {hue="1"}

//Dummy ITEM that is set via mqtt
Switch LivingRoomLights "Living Room Lights" {mqtt="<[mqtt:switches/livingroomlights:state:default]"}
So in my items file, I have the 2 light items and a dummy switch. Notice the 2 light items are in the “gLivingRoomLights” group. This is important.
Now for the rules.
rule "Living Room Lights"

when
Item LivingRoomLights changed
then
if(LivingRoomLights.state==ON)
{
gLivingRoomLights.sendCommand(ON)
logInfo("All Living Room Lights","ON")
}
else
{
logInfo("All Living Room Lights","OFF")
gLivingRoomLights.sendCommand(OFF)
//off
}
end
So this rule is triggered when the Dummy Switch (LivingRoomLights) changes. If the state was changed to ON then i send the “ON” command to the entire group. Same for when I turn it off. So to test it I used mqtt-spy and manually did it. All is working.

What’s next is I am going to work on shrinking said project down to using an arduino pro mini, 2 AAA batteries. For the network transmission I am back and forth between 2 options.
- esp8266 – using the esp is great, but it’s not very forgiving on power. I know there are deep sleep modes, but they aren’t really good for what I need with multiple buttons.
- nrf24l01 – RF modules. These little suckers are really easy on the power. If I use these I have to build a rf->ethernet bridge. But with these I think the power consumption is much simpler.
Either option I go with, I can use a pro mini and have 2 interrupts I can attach to buttons.
Down the road if I need more buttons, I can use a pro micro and get something like 14 interrupts and still be able to use deep sleep.
![]() If I wanted to cut holes in the wall and run cable I wouldn’t be as concerned with the battery levels.
If I wanted to cut holes in the wall and run cable I wouldn’t be as concerned with the battery levels.
Want to see it being tested?


Comments